All You Need to Know About G Mark Certification

When distributing products globally, ensuring product safety and compliance with regional standards is crucial for both manufacturers and the end user. One key certification for products sold in the Gulf Cooperation Council (GCC) countries is the G Mark certification. This article will explain what G Mark certification is, why it’s important, the types of products that require it, the certification process and how to navigate this complex process successfully.

What is G Mark Certification?

The G Mark, or Gulf Conformity Mark, is a certification mark required for certain products to be sold in GCC member states, which include Saudi Arabia, the UAE, Kuwait, Qatar, Oman and Bahrain. This mark indicates that a product meets the essential safety and quality standards set by the GCC Standardization Organization (GSO). The G Mark ensures that only safe, high-quality products enter the Gulf market.

Why is the Gulf Conformity Mark Compulsory?

The G Mark certification is essential for several reasons:

Consumer Safety – Consumer safety is the cornerstone of the G Mark certification. By ensuring that products meet stringent safety requirements, the G Mark significantly reduces the risk of accidents and health hazards. These safety standards are developed through rigorous testing and evaluation processes that identify potential dangers in products before they reach the market. By adhering to these stringent standards, manufacturers can prevent many common injuries and health issues, providing peace of mind to consumers. Examples of product testing include: 

  • Electrical appliances are tested for fire hazards, electrical shocks, and other risks that could harm users. 
  • Toys are evaluated for choking hazards, toxic substances, and sharp edges. 

Market Access – The G Mark is a mandatory requirement for products to be legally sold in GCC countries. Without this certification, products cannot enter the Gulf market, effectively barring them from a significant consumer base. This requirement applies to both locally manufactured and imported goods, ensuring that all products in the GCC market meet the same safety and quality standards. For businesses, obtaining the G Mark is not just a regulatory hurdle but a gateway to a lucrative market. It allows manufacturers and exporters to access a region with a high demand for safe and high-quality products, fostering business growth and expansion.

Credibility and Trust – Achieving G Mark certification significantly enhances a product’s reputation, building credibility and trust among consumers. In a competitive market, consumers are more likely to choose products that carry recognised certification marks, such as the G Mark, because it assures them of the product’s compliance with high safety standards. This mark serves as a visual endorsement of quality, signalling to customers that the product has undergone rigorous testing and meets the necessary safety criteria. For manufacturers and brands, this trust translates into increased customer loyalty, higher sales, and a competitive edge in the marketplace. It also helps mitigate the risks associated with product recalls and negative publicity resulting from unsafe products.

Regulatory Compliance – Compliance with regional laws and regulations is another critical aspect of the G Mark certification. By obtaining this certification, manufacturers and importers demonstrate their commitment to adhering to the legal requirements of the GCC countries. This compliance helps avoid legal penalties, fines, and market bans that can result from selling non-compliant products. Moreover, staying compliant with the G Mark standards ensures that businesses are always up-to-date with the latest safety and quality requirements, fostering a culture of continuous improvement and accountability. It also simplifies the regulatory process, as having a G Mark can streamline customs clearance and reduce delays in getting products to market.

What Kind of Products Require G Mark Certification?

G Mark certification is mandatory for a range of products that could potentially pose risks to consumer safety. The following list of examples is not exhaustive:

  • Electrical appliances
  • Toys
  • Machinery
  • Gas appliances
  • Construction materials
  • Personal protective equipment

What is the G Mark Certification Process?

Obtaining the G Mark certification involves several key steps:

1. Identify the Appropriate GCC Standard for Your Product – The first step is to identify the relevant GCC standards that apply to your product. These standards outline the specific requirements your product must meet to be eligible for certification.

2. Test the Product – Once the appropriate standards are identified, the next step is to conduct product testing. This testing must be performed by a recognised third-party inspection body to ensure impartiality and accuracy. Product inspection and raw material inspection are critical components of this phase to verify compliance with safety and performance standards.

3. Submit Test Results – After testing, the results must be compiled into a detailed report and submitted to the GSO or an approved certification body. This step is crucial as it forms the basis of the certification decision.

4. Obtain the G Mark Certificate – If the test results meet the required standards, you will receive a G Mark certificate. The certificate of conformity (CoC) is an essential document in this process, affirming that your product meets all applicable standards.

5. Recertification – To maintain the validity of the G Mark, periodic recertification is required. This involves re-evaluating the product to ensure it continues to meet the necessary standards over time to ensure ongoing compliance.

Managing the G Mark Certification Process

Navigating the G Mark certification process can be complex and time-consuming. Here are some tips to help you successfully obtain the certification:

  • Engage Third-party Inspection Services: Independent verification of product compliance with GCC standards can provide unbiased and accurate assessments.
  • Conduct Manufacturing Audits: Regular audits of your manufacturing processes can help ensure they meet regulatory requirements.
  • Perform Rigorous Product Testing: Ensure that your product undergoes comprehensive testing to confirm its safety and quality.
  • Prepare Detailed Documentation: Compile and submit all necessary documentation meticulously to support your certification application.

The G Mark certification is a critical requirement for accessing the GCC market, ensuring product safety and building consumer trust. By following these steps and leveraging expert assistance when needed, you can streamline the certification process, ensuring timely and successful acquisition of the G Mark certification. For help navigating the G Mark certification process, contact us here.

Top Supply Chain Trends in 2024

We’ve all heard the rumblings about how Artificial Intelligence (AI) technology is going to impact every industry and change job scopes, increase productivity and make production faster and more cost effective. Another trend is sustainability, and the supply chain industry, like every other, will be expected to toe the line in meeting sustainability targets in the years ahead. 

The supply chain industry is not immune to these challenges and stands to benefit considerably by these and other supply chain trends in 2024, especially in the face of evolving global demands and current complexities in transportation of goods. The rerouting and subsequent delay of cargo around the Cape of Good Hope to avoid the dangers in the Red Sea and Suez Canal and the backlog at strategic ports, especially in Asia is raising the costs of ocean shipment and adding uncertainty into the supply chain. Manufacturers need to stay ahead of trends to remain competitive and agile and ensure that their deliveries get to market as quickly and directly as possible.  Here are the top supply chain trends to watch in 2024, designed to optimise supply chain management.

Sustainability in Global Supply Chain Management

Sustainability has moved from being a buzzword to a core principle in supply chain management. In 2024, manufacturers are increasingly prioritising eco-friendly practices to meet regulatory requirements and consumer expectations. This shift is not just about compliance but also about building a sustainable future. Companies are investing in renewable energy sources, reducing waste, and optimising logistics to lower their carbon footprint. For instance, some manufacturers are adopting circular economy models, where products are designed for reuse, repair and recycling, minimising waste and resource consumption.

Moreover, sustainable supply chain practices can lead to cost savings. Efficient resource utilisation and waste reduction often result in lower operational costs. By incorporating sustainable practices, manufacturers can not only contribute to environmental conservation but also gain a competitive edge by appealing to eco-conscious consumers and stakeholders. In a world where consumers are increasingly making purchasing decisions based on a company’s environmental impact, sustainability becomes a key differentiator.

Artificial Intelligence Will Optimise Supply Chains in Real Time

Artificial Intelligence (AI) is transforming supply chain management by enhancing efficiency and accuracy. In 2024, AI applications in supply chains are expected to expand further. From predictive analytics that forecast demand and optimise inventory levels to advanced robotics automating warehouse operations, AI is revolutionising the industry. AI-driven demand forecasting tools can analyse historical data and market trends to predict future demand with high accuracy, allowing manufacturers to adjust production schedules and suppliers to adjust inventory levels and orders accordingly.

AI-powered automation is also making warehouses smarter. 

  • Autonomous robots and drones are being deployed for tasks such as sorting, packing and transporting goods, reducing the reliance on manual labour and minimising human error. 
  • AI-driven systems can analyse vast amounts of data in real-time, enabling suppliers to make informed decisions quickly to keep stocks readily available for shipment on demand. 

As AI technology becomes more sophisticated, its integration into supply chain processes will lead to significant cost savings and improved operational performance. The ability to predict disruptions and optimise supply chain routes in real-time can prevent delays and ensure timely delivery of products.

More Reliable Data Collection, Verification and Compliance

Data is the backbone of modern supply chains and, in 2024, the focus on data reliability will intensify. Accurate and timely data allows manufacturers to:

  • track inventory, 
  • monitor production processes, and 
  • forecast demand more effectively. 

With the advent of Internet of Things (IoT) devices and blockchain technology, data collection and verification have become more reliable than ever. 

IoT sensors provide real-time monitoring of goods in transit, capturing data on location, temperature, humidity, and other critical parameters.

Blockchain technology ensures data integrity by creating an immutable record of transactions. This technology can track the entire lifecycle of a product, from raw material sourcing to final delivery, ensuring transparency and accountability at every stage. 

The combination of IoT and blockchain technologies enhances data accuracy and reliability, enabling manufacturers to make better-informed decisions. This increased data reliability helps manufacturers enhance supply chain efficiency, reduce errors and improve overall decision-making.

Furthermore, reliable data is crucial for meeting regulatory compliance and quality assurance standards. Manufacturers can leverage data analytics to identify and address potential issues before they escalate, ensuring product quality and safety. In an era where supply chain disruptions are becoming more common, having access to reliable data allows manufacturers to respond swiftly and effectively.

More Transparency and Visibility

Transparency and visibility in the supply chain are critical for building trust with consumers and partners. In 2024, manufacturers will place a greater emphasis on creating transparent supply chains. Technologies already discussed such as blockchain and IoT can also play a pivotal role in this transformation. 

Blockchain provides a transparent and tamper-proof ledger of all transactions, making it easier to trace products from origin to end-user. This level of transparency is particularly important for industries such as food and pharmaceuticals, where product safety and authenticity are paramount.

IoT devices offer real-time tracking of goods, providing visibility into every stage of the supply chain. Manufacturers can monitor the movement of products, track environmental conditions, and receive alerts in case of deviations from expected parameters. Enhanced transparency and visibility not only improve operational efficiency but also foster trust and loyalty among customers who are increasingly demanding to know the origins of the products they purchase.

Consumers today are more informed and concerned about the ethical and environmental impact of their purchases. By providing transparency into their supply chains by doing environmental audit, manufacturers can build stronger relationships with consumers and differentiate themselves in the market. Transparency also facilitates better collaboration with supply chain partners, enabling more effective coordination and problem-solving.

As we move through 2024, manufacturers must adapt to these evolving supply chain trends to stay competitive  and meet the demands of a rapidly changing market. Embracing sustainability, leveraging AI, ensuring data reliability, and enhancing transparency are crucial steps for modernising supply chain operations. By staying ahead of these trends, manufacturers can improve efficiency, reduce costs, and build stronger relationships with customers and partners.

What Is The Certificate of Conformity?

A critical facilitator for the seamless export and import of goods is the Certificate of Conformity (COC). This document serves as an authoritative declaration that a product has met the required safety, quality and regulatory standards of the importing country. The COC is not merely a formality but a prerequisite for manufacturers aiming to penetrate international markets, ensuring that their products are compliant with the destination country’s regulatory environment.

For businesses engaged in the manufacturing sector, the significance of obtaining a COC cannot be overstated. It acts as a guarantor, assuring both trade partners and regulatory authorities that the product adheres to the minimum requirements set by the importing jurisdiction. This certification is essential for navigating the complex landscape of international trade regulations, where each country may have its own set of standards and compliance requirements.

The COC is, therefore, a linchpin for manufacturers, not only affirming the quality and compliance of their products but also facilitating smoother customs clearance, reducing the risk of entry barriers or delays. In essence, it underscores a manufacturer’s commitment to global standards of excellence, ensuring their products are positioned for success in the competitive international marketplace.

What is the Purpose of a Certificate of Conformity ?

The main job of the COC is to be the bridge of trust between manufacturers, regulators and consumers. It serves multiple purposes:

Safety and Quality Assurance: It tells consumers and businesses that the product they are buying isn’t going to fail within the period of warranty and won’t cause any harm in its use.

Regulatory Compliance: For manufacturers, it’s a pass to show that they’re not playing by their own rules but following industry standards.

Market Access: Having a COC can also be the golden ticket to entering new markets, especially those with strict regulations such as the EU or the USA.

Is Certificate of Conformity Mandatory?

Whether a COC is mandatory depends on what you’re making and where you’re selling it. In many industries and countries, especially those with strict safety and environmental audit standards, it is likely mandatory. For others, it might be voluntary but highly recommended, as it can significantly ease the process of entering new markets and gaining customer trust.

How to Get a Certificate Of Conformity?

Getting a COC involves a few steps, which can vary depending on the product and the regulations in your industry.

Know the Requirements: Before embarking on the journey to secure a COC, it’s critical to thoroughly understand the specific standards and regulatory requirements that are relevant to your product in your target market. This groundwork involves pinpointing the international or regional standards, such as ISO standards or European CE marking directives, which dictate the safety, quality and performance criteria your product must meet.

Test and Evaluate: With the relevant standards in mind, the next step is to engage with an accredited laboratory that specializes in testing products within your industry. The chosen laboratory will subject your product to a series of tests that measure compliance with the required standards. Following this, the laboratory testing will produce detailed test reports that reflect how well the product aligns with the regulatory criteria.

Compile Documentation: After successful testing, the next phase is to compile a comprehensive file of documentation. This file typically includes the test reports from the accredited lab, a detailed description of the manufacturing processes, proof of quality control mechanisms in place and any other information that demonstrates consistent compliance with the standards.

Apply for the COC: Finally, you’ll take all of this evidence and apply for the COC with the appropriate regulatory body or certification agency. This involves submitting a package of documents, including the results from the accredited laboratory, your internal quality control documentation and often a Declaration of Conformity, which is a self-declaration that your product meets all the necessary regulations. The regulatory body then reviews your submission and, if satisfied, issues the Certificate of Conformity.

This certificate is an official document affirming that a product has been evaluated and approved as meeting the necessary quality, safety, and performance standards, enabling you to trade within and across international borders with confidence.

What Details are Included in the Certificate of Conformance?

A COC is not just a piece of paper; it’s a comprehensive document that includes vital information about the product, such as:

Manufacturer’s Details: This serves as the identity card for the product’s origin. It includes the full name and address of the manufacturer, as well as contact information. It may also list any additional manufacturing sites if relevant to the certification process. This information provides traceability and accountability, enabling authorities and consumers to know exactly who is responsible for the product.

Product Specifications: Here, you will find a detailed description of the product, including its design, type, model and any variations if applicable. The specifications also cover the materials and components used, their source and the technical parameters that define the product’s performance. This could extend to dimensions, weight, capacities, or other pertinent physical and functional characteristics that are relevant to the standards the product must meet.

Test Results: The test results offer concrete evidence of the product’s compliance with the listed standards. This section summarizes the outcomes of all assessments carried out by the accredited laboratory or testing facility. It includes detailed results of each test, measurements taken and how these compare to the required thresholds or acceptance criteria.

Standards Met: This critical part of the COC lists all the specific standards and regulations the product complies with. These could be international standards like those set by the International Organization for Standardization (ISO) or specific regional directives such as the EU’s CE marking requirements. This demonstrates that the product has been rigorously evaluated and meets the established criteria for quality, safety and performance.

Batch or Serial Number: To ensure that the COC is linked to a specific set of products, each certificate carries a unique identifier. This could be a batch number, which relates to a group of products manufactured in a single run under uniform conditions, or a serial number for individual product tracking. This number is vital for recalls, quality assurance processes, or regulatory checks, allowing for the precise identification of the certified product group or unit.

Together, these details compose the COC, a document that not only affirms compliance but also provides the necessary transparency and assurance for regulators, trade partners and consumers about the product’s adherence to required standards.

 What is the Difference Between a COA and COC?

A Certificate of Analysis (COA) and a Certificate of Conformity (COC) might sound similar, but they serve different purposes. A COA is more about the product’s specific test results and measurements, showing how it performed in tests against certain parameters. It’s like a report card. On the other hand, a COC is an overall declaration that the product meets the required standards, more like a graduation certificate.

When exporting goods, safety and quality cannot be compromised and the Certificate of Conformity stands as a beacon of assurance. The responsibility that accompanies the issuance of a COC is substantial. As a manufacturer, by affixing your signature to this document, you are making a firm commitment that your product fully adheres to the legal standards required. This is not a declaration to be taken lightly. As an importer, it is imperative that you have the capacity to produce the COC upon request, as failure to do so can result in significant financial penalties.

Beyond the immediate risk of fines, the gravity of responsibility extends to the condition of the product itself. Should any product be found defective, the importer – and by extension, the manufacturer – is held accountable for any resultant damage. Such scenarios can lead to the even more serious action of product recalls, a costly and reputation-damaging affair.

Given these extensive implications, it is clear that the COC represents a crucial step in your manufacturing and distribution process. It is of utmost importance to approach this with diligence and thoroughness, ensuring that your products unequivocally meet all the necessary legal requirements. The COC is not just a document; it is a testament to the integrity and safety of your products and, by extension, your brand.Contact us for enquiries on how to prepare a Certificate of Conformity that meets the standards of the jurisdictions into which you are importing.

WHAT ARE AQL GENERAL INSPECTION LEVELS?

Quality control is an essential aspect of manufacturing and production processes across various industries. Ensuring that the final products meet the required standards is crucial for maintaining customer satisfaction and brand reputation. One widely used method in quality control is the Acceptable Quality Limit (AQL) system, which helps manufacturers determine the acceptable and unacceptable levels of defects in a batch of products. In the AQL sampling system, General Inspection Levels play a pivotal role.

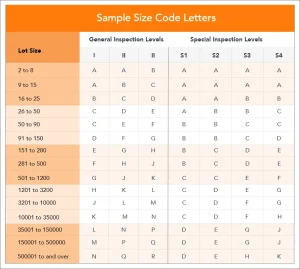
General Inspection Levels are instrumental in maintaining product quality across various manufacturing scenarios. These levels, ranging from Level I’s stringent scrutiny to Level III’s efficiency-driven approach, offer a structured framework for determining sample sizes and acceptance criteria. They give a clear plan for figuring out how many samples to inspect and what’s acceptable.

Picking the right AQL inspection level depends on how important the product is, how problems might affect it, and how much it costs. Each level finds a good balance between careful checking and not slowing things down too much. This helps makers feel sure about sending out products that meet what customers expect and keep their brand’s reputation strong.

What are the General Inspection Levels in the AQL Chart?

The AQL system categorizes inspection into three main General Inspection Levels: Level I, Level II, and Level III. Each of these levels is tailored to address different manufacturing contexts and quality control requirements.

General Inspection Level I

At the apex of scrutiny lies General Inspection Level I. This level is reserved for products where defects can have severe consequences, be it in terms of safety, functionality, or overall quality. Here, even minor deviations from the desired standards could lead to substantial issues. The sampling plan associated with Level I involves a relatively smaller sample size but with heightened precision, allowing for the detection of even the slightest defects. Manufacturers opt for this level when the stakes are high, and the cost of potential defects far outweighs the expenses of rigorous inspection.

General Inspection Level II

Balancing vigilance with practicality, General Inspection Level II is often the go-to choice for many manufacturers. This level caters to products with moderate criticality, where defects might impact the product’s performance or aesthetics but might not necessarily pose significant risks. The sampling plan here strikes a harmony between accuracy and efficiency, making it a versatile option across a range of scenarios. Level II embodies the essence of an all-encompassing approach, where quality is prioritized without overburdening the production process.

General Inspection Level III

For products with lower criticality or when quality standards are more lenient, General Inspection Level III is the optimal choice. This level accommodates larger batch sizes while still adhering to acceptable defect limits. While the tolerance for defects is slightly higher compared to the previous levels, it is essential to clarify that this level does not compromise on quality. Rather, it reflects an efficient approach suited for scenarios where defects might have a limited impact.

Which General Inspection Level is Appropriate for Your Situation?

A critical decision that manufacturers face is selecting the most suitable General Inspection Level from the AQL system. This choice is far from arbitrary—it’s a strategic decision that strikes the balance between quality assurance and production efficiency. To make the right call, consider your product’s criticality, the potential impact of defects, cost implications, and customer expectations.

In quality control, precision is paramount. Ensuring that the sample size for inspection accurately represents the entire batch is a pivotal step in this process. The AQL system simplifies this task through its General Inspection Levels, each accompanied by a distinct sampling plan. Here’s a closer look at how you can navigate this system to determine the optimal sample size for your quality control needs.

Decoding the AQL Codes

The AQL system employs a coding mechanism that consists of letters and numbers, offering a roadmap to determining sample sizes. The letters—S, L, and T—indicate different sampling schemes, while the numbers signify specific plans within those schemes.

For instance, consider the code “S-2.” The letter “S” denotes the normal inspection level, and the number “2” signifies a particular sampling plan within that AQL level. By referencing the relevant tables provided in AQL documentation, you can unveil the recommended sample size and the acceptable defect limits.

Step-by-Step Process

  • Identify the Appropriate Level: Begin by choosing the General Inspection Level that suits your product’s context. Is it a critical component that demands meticulous inspection (Level I), or is a more balanced approach (Level II or III) appropriate?
  • Decode the Code: Once you’ve selected the General Inspection Level, look up the corresponding AQL code. This code will guide you in determining the sample size that aligns with your chosen level.
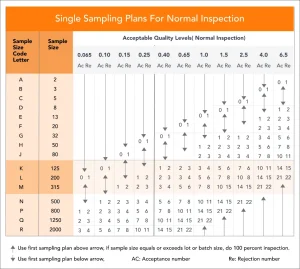
  • Consult the AQL Table: With the AQL code in hand, refer to the tables provided in the AQL documentation. These tables detail the specific sampling plans associated with each code. Locate your chosen code and proceed to the next step.
  • Sample Size and Acceptable Limits: The AQL tables will present you with the recommended sample size based on your chosen level and code. Additionally, you’ll find information on the acceptable limits of defects within that sample.
  • Balancing Act: Keep in mind that while smaller sample sizes might streamline inspection processes, larger samples offer more accurate representations of the batch’s quality. Consider your production volumes, resources, and the level of certainty you require.

The Value of Precision

Determining the appropriate sample size is akin to finding equilibrium. It’s about obtaining sufficient data for informed choices without burdening resources or impeding production. In this endeavor, the AQL system proves invaluable. With its General Inspection Levels and associated codes, it simplifies this process to a great extent.

However, remember that while the AQL system provides guidelines, each manufacturing scenario is unique. like product criticality, potential defect repercussions, and the desired confidence level all influence the equation. Therefore, treat the AQL system as a versatile tool—one that can be adapted and refined based on your specific needs.

What About the Special Inspection Levels?

Special Inspection Levels are like the extra tools in the quality control toolbox. They are a set of unique inspection plans within the AQL system, specifically designed for situations that don’t fit the standard mold. These levels are labeled as S1, S2, S3, S4, and S5.

Imagine you’re dealing with a batch that’s much smaller or much larger than usual. Or maybe the product you’re making is so important that even a tiny defect could have big consequences. This is where Special Inspection Levels come into play. They offer specialized plans to make sure that these exceptional situations get the right kind of attention. So, if your scenario is a bit out of the ordinary, these Special Inspection Levels are here to provide tailored solutions and ensure that your products meet the necessary quality standards.

Conclusion

When it comes to quality control, Global Inspection Managing stands out as the ideal choice. Our expertise in the AQL General Inspection Levels sets us apart, ensuring that your products meet the highest standards. From the meticulous checks of Level I to the balanced approach of Level II and the efficient methods of Level III, our services are tailored to your needs. We’re not just limited to the standard levels – we’re well-versed in Special Inspection Levels too, providing comprehensive solutions for unique scenarios. With our skilled team and deep AQL system knowledge, we’re here to help you achieve great quality control and product excellence.

The AQL General Inspection Levels provide a structured approach to quality control, allowing manufacturers to maintain consistent product quality across different scenarios. By tailoring the quality control method  to the specific nature of the product and its potential impact on users, businesses can strike a balance between quality assurance and operational efficiency. In the complex landscape of manufacturing, where defects can have far-reaching consequences, the AQL system, with its General and Special Inspection Levels, serves as a reliable compass, guiding manufacturers toward making informed decisions about quality control.

With the AQL 2.5 chart as a guide, you can navigate the intricate path of quality control with confidence, ensuring that your products meet the highest standards and leave a positive imprint on your brand’s reputation.

FINAL RANDOM INSPECTION: IMPORTANCE, STEPS AND LIMITATIONS

Quality control is an integral aspect of the manufacturing process that ensures products meet predetermined standards before they reach the hands of consumers. Among the various quality control methods employed such as root cause analysis, AQL sampling, visual inspection, and control charts, to name a few,  Final Random Inspection (FRI) holds a crucial place.

Final Random Inspection, commonly known as FRI, is a critical quality control process conducted near the completion of the manufacturing cycle. It involves the inspection of randomly selected samples from a production batch to determine whether the products meet the predetermined quality standards, specifications, and other requirements. FRI serves as a final checkpoint to ensure that the products are in line with the desired quality before they are shipped to distributors, retailers, or end consumers.

What is a Random Inspection?

A random product inspection is a quality control methodology designed to assess the overall quality of a production batch by inspecting a randomly selected subset of items. This inspection approach is based on the principle that examining a representative sample from the batch provides valuable insights into the batch’s overall quality level.

By avoiding biased selection and employing randomness, a random inspection aims to identify potential defects, inconsistencies, or deviations from specifications that might be present in the entire batch. This approach helps manufacturers make informed decisions about the acceptability of the entire batch, enhancing product quality and minimizing the risk of substandard products reaching the market.

What Is MIL-STD-105E?

MIL-STD-105E, also known as Military Standard 105E, is a pivotal statistical sampling plan that provides comprehensive guidelines for conducting sampling inspections in various industries. Developed by the United States Department of Defense, this standard offers a structured framework for determining the sample size, acceptance criteria, and levels needed to assess the quality of products efficiently.

MIL-STD-105E’s methodology ensures a balance between inspecting an adequate number of samples to make informed decisions about batch quality while minimizing the resources and time required for the inspection process. This standardized approach has transcended its military origins and become a foundational reference for quality control professionals across diverse sectors, enhancing the precision and reliability of quality assessments.

Importance of FRI Inspection

The role of Final Random Inspection (FRI) in quality control is paramount. As a pivotal step in the manufacturing process, FRI plays a crucial role in upholding product quality, mitigating risks, and ensuring customer satisfaction. By providing a last-minute opportunity to identify and rectify potential issues before products reach the market, FRI acts as a robust safeguard against subpar products and serves as a testament to a manufacturer’s commitment to delivering excellence. Let’s explore the multifaceted importance of FRI and its far-reaching implications for industries driven by quality and consumer trust.

  • Quality Assurance: FRI serves as the last line of defence before products reach the market. It ensures that only products meeting the specified quality criteria are released, reducing the chances of subpar products reaching consumers.
  • Risk Mitigation: By randomly selecting samples for inspection, FRI minimizes the possibility of biased selection. This helps in identifying issues that might be overlooked during production inspection, thereby reducing the risk of defective products reaching consumers.
  • Supplier Accountability: Implementing FRI places responsibility on suppliers to consistently deliver high-quality products. This, in turn, fosters better collaboration between manufacturers and suppliers, leading to overall improved product quality.
  • Cost Efficiency: Identifying and rectifying issues early in the manufacturing process is more cost-effective than dealing with problems after the products have been shipped. FRI helps in catching defects before they snowball into larger problems.

Steps of a Final Random Inspection in Quality Control

The implementation of FRI involves a series of structured steps to ensure an unbiased and accurate assessment of the product batch. These steps can be outlined as follows:

  • Sampling Plan Creation: The first step involves creating a sampling plan based on recognized standards, such as MIL-STD-105E. This plan determines the number of samples to be inspected and the acceptance criteria.
  • Random Sample Selection: Samples are chosen randomly from the batch, ensuring that each product has an equal chance of being selected. This randomness is crucial to obtaining a representative assessment of the batch’s overall quality.
  • Visual Inspection: The selected samples undergo a comprehensive visual inspection to identify any visible defects, inconsistencies, or deviations from specifications.
  • Functional Testing: Depending on the nature of the products, functional tests may be conducted to evaluate their performance against predefined criteria.
  • Documentation and Reporting: The findings of the inspection are meticulously documented, including the number of defects found, the severity of each defect, and their distribution within the batch. This comprehensive report forms the basis for further actions and decisions.
  • Decision Making: Based on the product inspection procedure and reporting, a decision is made whether to accept, reject, or rework the entire batch. This decision is guided by the predetermined acceptance criteria.

Limitations of Final Random Inspection

While Final Random Inspection is an invaluable tool in quality control, it’s important to acknowledge its limitations:

  • Sampling Bias: Despite efforts to ensure randomness, there is always a slight chance of sampling bias, where certain types of defects might be overrepresented or underrepresented in the selected samples.
  • Limited Scope: FRI assesses only a portion of the entire batch. As a result, it might not identify all potential issues that could arise from variations across the entire batch.
  • Statistical Variability: The effectiveness of FRI can be influenced by statistical variability. In some cases, a sample might appear to have a higher defect rate purely due to chance.
  • Time Sensitivity: FRI occurs at the final stages of production, which means any identified issues might require hasty corrective measures, potentially affecting delivery timelines.

Conclusion

Global Inspection Managing stands out as the ideal partner for Final Random Inspection (FRI), offering a seamless blend of expertise, experience, and commitment. With a proven track record in factory audits and quality control, we bring a wealth of knowledge to the table, ensuring that every FRI is conducted with meticulous attention to detail. Our deep understanding of industry standards, coupled with rigorous inspection protocols, guarantees that no defect goes unnoticed. Moreover, our global reach and network of seasoned quality control inspectors mean that FRI can be executed efficiently, regardless of the product’s origin.

The significance of Final Random Inspection (FRI) in quality control is undeniable. Its role in safeguarding product quality, mitigating risks, and ensuring customer satisfaction cannot be overstated. While FRI has its limitations, it remains an indispensable tool for manufacturers striving to uphold their commitment to delivering products that meet the highest standards. By adopting a methodical approach and adhering to recognized industry protocols, manufacturers can harness the potential of FRI to consistently provide exceptional products to consumers worldwide.

KEY DIFFERENCES BETWEEN AUDIT AND INSPECTION

In today’s competitive business environment, quality management is of utmost importance for organizations to ensure that their products or services meet the highest standards. Audit and inspection are two essential processes that organizations use to assess their quality management practices and ensure compliance with predetermined standards. Although people often use these terms interchangeably, it is essential to note that these are distinct processes with significant differences in their nature, scope, outcomes, and complexity. This blog will explore the key differences between audit and quality control inspection to help organizations understand their unique characteristics and choose the right approach for their quality management needs.

What Does Audit Mean?

An audit is a systematic and independent examination of an organization’s financial records, internal controls, and operational processes to determine whether they comply with established policies, procedures, and regulations. Internal or external auditors, trained and certified, conduct audits to assess an organization’s financial and operational performance.

Audits typically involve a comprehensive review of an organization’s financial statements, accounting records, internal controls, and other relevant documents. Auditors collect evidence, conduct interviews, and perform analytical procedures to evaluate the financial information’s accuracy, completeness, and reliability. The objective of an audit is to provide an opinion on the fairness and reliability of an organization’s financial statements and to identify areas of improvement in internal controls and operational processes.

Audits can be classified into various types, such as financial audit, operational audit, compliance audit, and information technology audit, depending on the nature and scope of the audit. Organizations conduct ethical audits periodically, usually annually, to ensure compliance with legal requirements, internal policies, and industry regulations.

What is Quality Inspection?

On the other hand, quality inspection examines products or services to determine whether they meet the specified quality standards and requirements. They are typically conducted during different stages of the production process or before shipment to customers. Internal or external inspectors, who are trained and certified, perform inspections to assess the quality of products or services.

Service and product inspections involve checking the physical characteristics, functionality, performance, and other attributes against predetermined quality standards or specifications. Inspectors use various tools and techniques, such as visual inspection, measurement, testing, and sampling, to determine whether products or services meet the required quality criteria. The objective of an inspection is to identify defects, non-conformities, or discrepancies in products or services and take corrective actions to ensure that they meet the specified quality standards.

An inspection can be classified into different types, such as incoming inspection, in-process inspection, final inspection, and pre-shipment inspection methods, depending on when they are performed during production. Independent third-party inspection agencies can also conduct checks to provide unbiased assessments of the quality of products or services.

Key Differences between Audit and Inspection

Audit and inspection are not merely similar, but fundamentally distinct processes with crucial differences. While they both involve evaluating products or services, audit and inspection have unique characteristics that set them apart from each other. Let’s take a look at audit vs inspection.

Inspection is an action, while an audit is a process: Inspection is a focused action that involves evaluating products or services against established quality standards or specifications. It serves as a point-in-time assessment, aimed at identifying any defects or non-conformities in the products or services being evaluated.

On the other hand, an audit is a systematic process of evaluating an organization’s financial records, internal controls, and operational processes. It involves a comprehensive review of financial information, internal policies, and industry regulations over a period of time. Auditors collect evidence, conduct interviews, and perform analytical procedures to assess an organization’s financial and operational performance.

Inspection is qualitative, while an audit is quantitative: Inspection zeroes in on the physical characteristics, functionality, performance, and other vital attributes of products or services. It employs visual inspection, meticulous measurement, rigorous testing, and thoughtful sampling to determine whether they meet the required quality criteria. The outcome is usually qualitative, clearly indicating whether products or services pass or fail based on predetermined quality standards.

On the other hand, an audit focuses on financial records, internal controls, and operational processes of an organization, which are mostly quantitative. Auditors review financial statements, accounting records, and other financial data to assess financial information’s accuracy, completeness, and reliability. The outcome of an audit is typically quantitative, providing a detailed analysis of an organization’s financial and operational performance, identifying areas of improvement, and providing recommendations for corrective actions.

Inspection is like a glance, audit a deep dive: 

Inspection is a relatively straightforward process that involves checking products or services against predetermined quality standards or specifications. Trained inspectors typically carry out inspections by following predefined procedures and criteria. They may utilize various tools and techniques, such as visual inspection, measurement, testing, and sampling. However, the process is generally straightforward, clearly focusing on identifying defects or non-conformities.

On the other hand, auditing is a complex process that requires in-depth knowledge of financial and operational concepts, principles, and regulations. Auditors need to thoroughly understand an organization’s financial records, internal controls, and operational processes and use professional judgment to assess their effectiveness. Auditors may also need to perform extensive data analysis, conduct interviews, and review a large volume of documents, making the audit process more intricate and time-consuming compared to the inspection.

The audit gives recommendations, while the inspection creates action: Another difference is the outcomes. An audit typically results in a formal report that includes the auditor’s opinion on an organization’s financial statements and provides recommendations for improving internal controls and operational processes. The purpose of the recommendations is to assist organizations in identifying and addressing weaknesses or deficiencies in their financial and operational systems to improve their overall performance.

On the other hand, the outcome of an inspection is usually an action or decision regarding the quality of products or services based on predetermined standards. Products or services are considered acceptable and released for further processing or shipment if they pass the inspection. However, if products or services do not pass the inspection, they are considered non-conforming, and prompt corrective actions must be taken to address the identified defects.

Conclusion

Both factory audit and inspection play critical roles in ensuring quality management within an organization. They provide valuable insights and recommendations for improving processes, identifying non-conformities, and enhancing overall performance. Organizations must choose the right partner for audit and inspection to ensure that their quality management processes are robust, reliable, and effective.

Global Inspection Management (GIM) is a trusted audit and inspection service provider offering expertise, experience, comprehensive services, advanced tools and techniques, customized solutions, independent and unbiased assessments, timely and efficient services, and global coverage. With our professional audit and inspection services, you can strengthen your business’ quality management practices, improve operational efficiency, and enhance customer satisfaction.

So, whether you need financial audits, operational audits, compliance audits, incoming inspections, in-process inspections, final inspections, pre-shipment inspections, or other quality management services, GIM can be your reliable partner in ensuring your organization meets the highest standards of quality and performance.

Choose GIM for your audit and inspection needs, and experience the benefits of professional, reliable, and comprehensive quality management services. Contact our team today to learn more about how we can support your organization’s audit and inspection requirements.